
Ever stood in your kitchen trying to wash a massive roasting pan, only to realize your basin is too shallow while water splashes everywhere? A poorly planned workstation turns simple meal prep into a frustrating chore. After helping homeowners replace both drop-in and undermount sinks over the years, I’ve noticed that most installation problems aren’t caused by expensive materials—they start with inaccurate measurements and poor preparation. When your counter joints start leaking or your drain backs up during dinner clean-up, the root cause usually traces back to improper layout planning or faulty fitting. Whether you are remodeling a historic suburban house or building a brand-new contemporary kitchen, getting the right kitchen sink installation right from day one saves you from costly water damage and daily headaches.
Understanding the US Standard kitchen sink installation Landscape
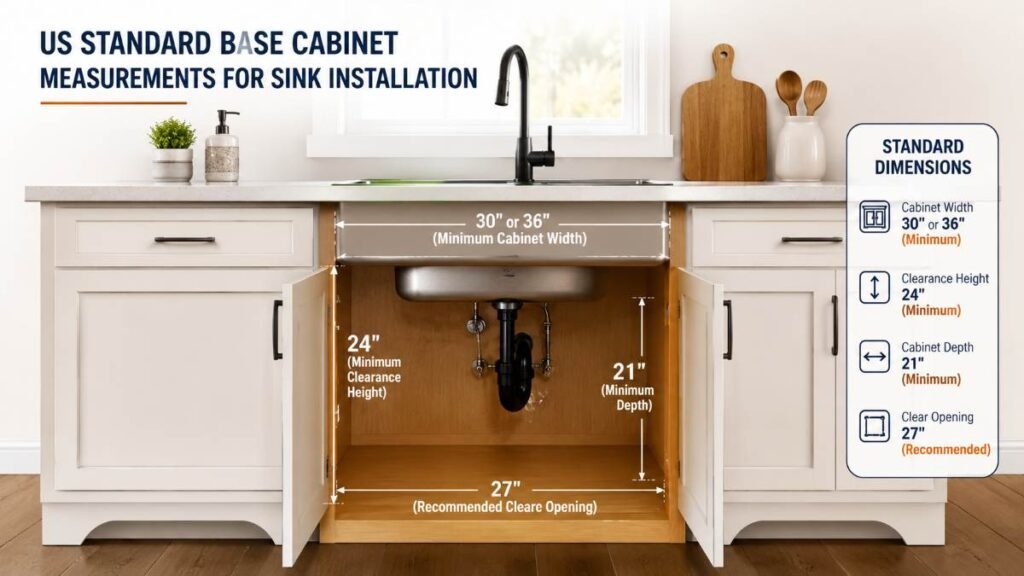
Before picking up a wrench or choosing a basin material, homeowners need to understand standard US cabinetry dimensions and plumbing layouts. Most American base cabinets feature a standard width of 33 inches or 36 inches, which directly dictates your maximum sink size. Furthermore, local building codes across various states specify exact P-trap heights, supply line clearances, and venting requirements to prevent sewer gas leaks.
When you take the time to prepare properly, you avoid the mess of a DIY disaster and end up with a reliable, watertight setup. This is especially true when coordinating your layout with an overall kitchen remodeling mistakes prevention plan or exploring broader home improvement ideas. Always verify local municipal codes before modifying drain lines or supply connections, as structural requirements and venting mandates can vary significantly across different states. Planning a proper kitchen sink installation always begins with these essential baseline checks.
Essential Safety Guidelines Before You Begin
Embarking on a plumbing and carpentry project requires strict adherence to safety protocols to prevent personal injury or structural damage to your home:
- Shut Off Water Supply: Always locate and firmly close both the hot and cold water shut-off valves under the sink before disconnecting any existing hardware.
- Wear Protective Gear: Safety glasses protect your eyes from falling debris, drywall dust, or metal shavings when cutting countertops or sawing old pipes. Wear sturdy work gloves when handling sharp stainless steel edges.
- Inspect Electrical Proximity: Ensure there are no active electrical outlets or garbage disposal wiring exposed near standing water zones while working underneath the cabinet basin.
- Never Overtighten PVC Components: Hand-tighten plastic slip-joint nuts and finish with a quarter-turn using pliers. Overtightening strips plastic threads and causes immediate hidden leaks.
Cost Breakdown for Kitchen Sink Setup
. Cost Breakdown for Kitchen Sink Setup
Installation Type | Average Estimated Cost | Key Cost Factors |
DIY Installation | $50 – $150 | Sealants, plumbing fittings, basic tools |
Professional Installation | $200 – $600 | Labor, plumbing rerouting, custom countertop cuts |
Step-by-Step Professional kitchen sink installation Process
Executing a clean, leak-free kitchen sink installation requires methodical steps and careful attention to detail. Follow this structured workflow to ensure your basin sits securely and drains flawlessly:
- Template Tracing and Countertop Cutting: Place the manufacturer-provided cardboard template onto your laminate, quartz, or granite slab. Trace the cut line carefully, double-check your measurements, and use a jigsaw or specialized stone-cutting saw to carve out the opening.
- Pre-Fitting and Dry Run: Drop the sink into the freshly cut slab opening before applying any sealants. Check for level alignment and ensure the basin clears interior cabinet bracing and water supply lines underneath.
- Hardware and Faucet Preparation: Install your kitchen faucet, soap dispenser, and mounting brackets while the sink is still easily accessible on your workbench or resting loosely in the cutout. Tighten the mounting nuts securely.
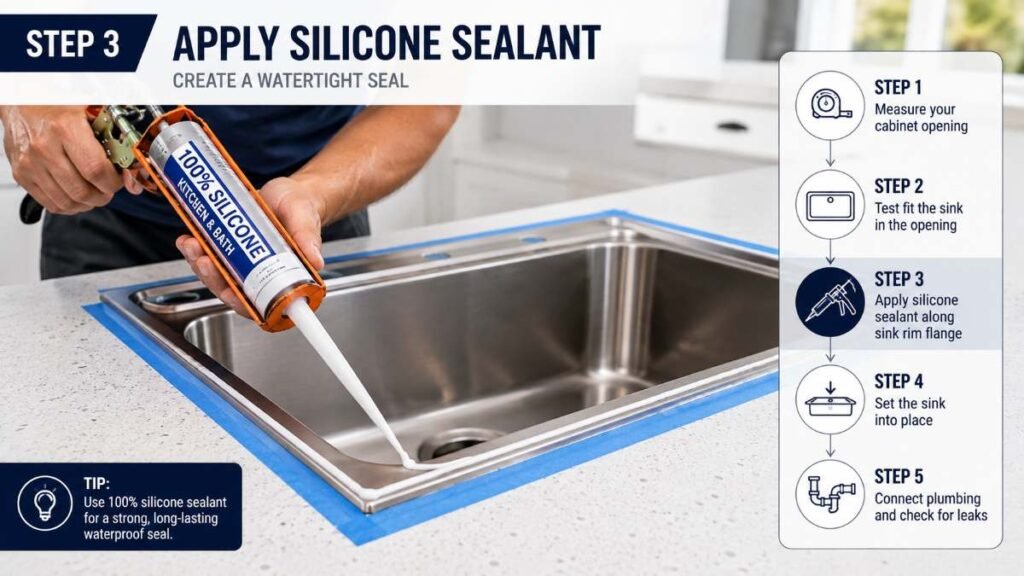
- Applying Waterproof Sealant: Apply a generous, continuous bead of 100% silicone sealant or plumber’s putty around the perimeter rim of the sink flange. This creates a vital moisture barrier that protects underlying wooden cabinets from rotting.
- Securing the Basin: Lower the sink firmly into place, pressing down evenly to squeeze out excess silicone. From underneath the counter, tighten the mounting clips or fastener screws in a crisscross pattern to pull the basin flush against the underside or top surface.
- Assembling Drain Assemblies and P-Traps: Connect the sink strainers, tailpieces, and P-trap unit. Make sure all rubber washers and slip-joint nuts fit smoothly to block hidden leaks.
- Water Line Hookup and Testing: Connect your hot and cold flexible supply lines to the shut-off valves. Turn the water back on slowly, run the faucet for a full minute, and inspect every connection underneath with a dry paper towel to verify absolute dryness.
Executing these steps methodically guarantees a stress-free kitchen sink installation experience.
Understanding the Under-Sink Plumbing Flow Diagram
Visualizing how water travels through your assembly helps diagnose performance issues instantly:
Understanding Under-Sink Plumbing Water Flow
- Step 1: Fresh Water Intake ➔ [Main Supply Line] ➔ [Shut-Off Valves] ➔ [Flexible Connectors]
- Step 2: Fixture Usage ➔ [Faucet & Aerator] ➔ [Sink Basin & Basket Strainer]
- Step 3: Waste Evacuation ➔ [Tailpiece Pipe] ➔ [P-Trap Liquid Seal] ➔ [Wall Drain & Vent Line]
Crucial Factors to Consider Before Buying a Sink
Choosing the right model during your kitchen sink installation project determines how comfortable your workspace will be for years to come. Consider these essential selection criteria:
- Basin Depth: Sinks measuring 9 to 10 inches deep easily accommodate large pots, but extremely deep models can cause lower back strain during extended dishwashing sessions.
- Material Durability: Stainless steel offers lightweight resilience and affordability, while composite granite and fireclay provide heavy-duty scratch resistance and striking visual aesthetics.
Configuration Options: Single-bowl sinks maximize open space for oversized cookware, whereas double-bowl layouts allow simultaneous washing and rinsing tasks.
Advanced Plumbing and Drainage Optimization
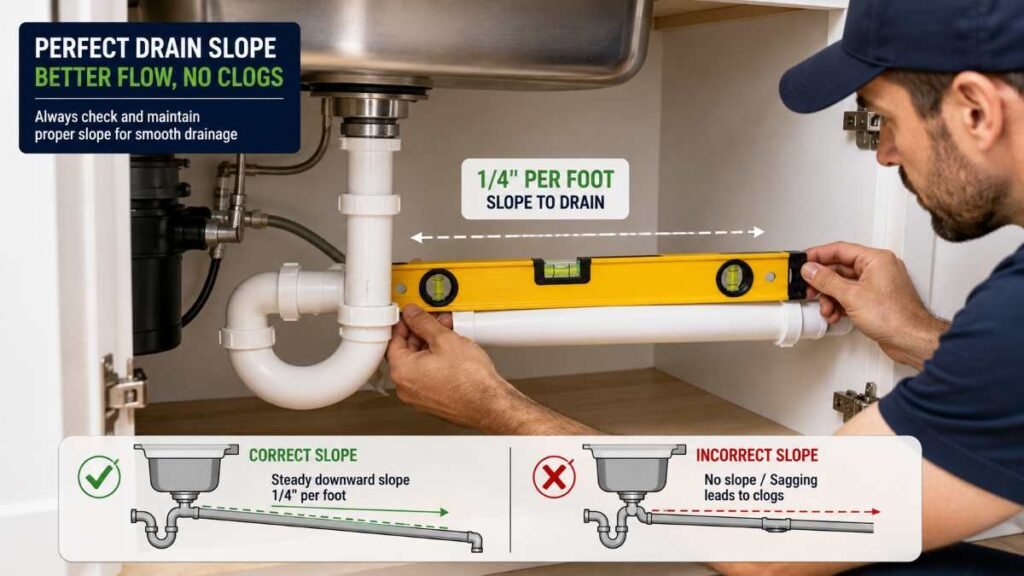
Getting a sink to last and perform well over the long haul takes more than just dropping it into a hole in the counter. Proper management of waste water dynamics, slope gravity, and venting prevents foul odors from creeping back up through your drains. American residential plumbing codes mandate a strict downward slope of one-quarter inch per foot on horizontal drain lines to guarantee rapid waste evacuation.
Furthermore, integrating your sink layout smoothly with surrounding counters—similar to organizing workflow in an outdoor kitchen ideas project or planning a compact small kitchen island ideas layout—ensures that food prep, washing, and waste disposal happen seamlessly without causing traffic bottlenecks in busy household environments. Following these structural guidelines ensures every kitchen sink installation remains fully functional for decades.
Comparing Popular Sink Types for American Homes
Sink Type | Best Suited For | Primary Advantages | Potential Disadvantages |
Top-Mount (Drop-In) | Budget-friendly retrofits, laminate counters | Easy DIY installation, supports heavier weight | Lip catches food debris and grime |
Under-Mount | Granite, quartz, or solid surface counters | Sleek modern appearance, effortless wipe-down | Requires professional fabrication and heavy clips |
Farmhouse (Apron-Front) | Traditional, rustic, or spacious luxury kitchens | Deep basin, comfortable ergonomic leaning position | Requires customized sink base cabinet modifications |
Essential Tools and Materials Checklist
Gathering your equipment beforehand prevents mid-project interruptions. Ensure you have these ready for your kitchen sink installation:
- Jigsaw (for wood/laminate) or diamond-blade wet saw (for stone)
- Basin wrench and adjustable slip-joint pliers
- Plumber’s putty and professional-grade silicone waterproof sealant
- Plumb bob or tape measure and masking tape
- Flashlight or under-sink work light
- Clean microfiber towels for wiping excess adhesive
Post-Installation Maintenance and Leak Prevention
Once your basin is fully secured and tested, establishing a regular maintenance routine preserves its pristine appearance and structural integrity. Over time, constant exposure to heavy pots, hard water minerals, and aggressive cleaning agents can weaken silicone seals around the rim. Inspect the underside of your cabinet every six months for dampness or mineral buildup near slip-joint nuts and supply connections.
If you encounter unexpected leaks or valve failures that require urgent attention, consulting professional resources like emergency plumbing repair guides will help you mitigate water damage quickly before it warps your wooden base cabinets. Keeping strainers clean and avoiding harsh chemical drain cleaners will also extend the lifespan of your P-trap and tailpiece assembly.
Conclusion and Practical Recommendation
A successful kitchen sink installation transforms your culinary workspace into an efficient, hygienic hub. Take your time measuring cabinet dimensions, invest in quality silicone sealants, and always perform a rigorous pressure test on your drain and supply lines before packing away your tools.
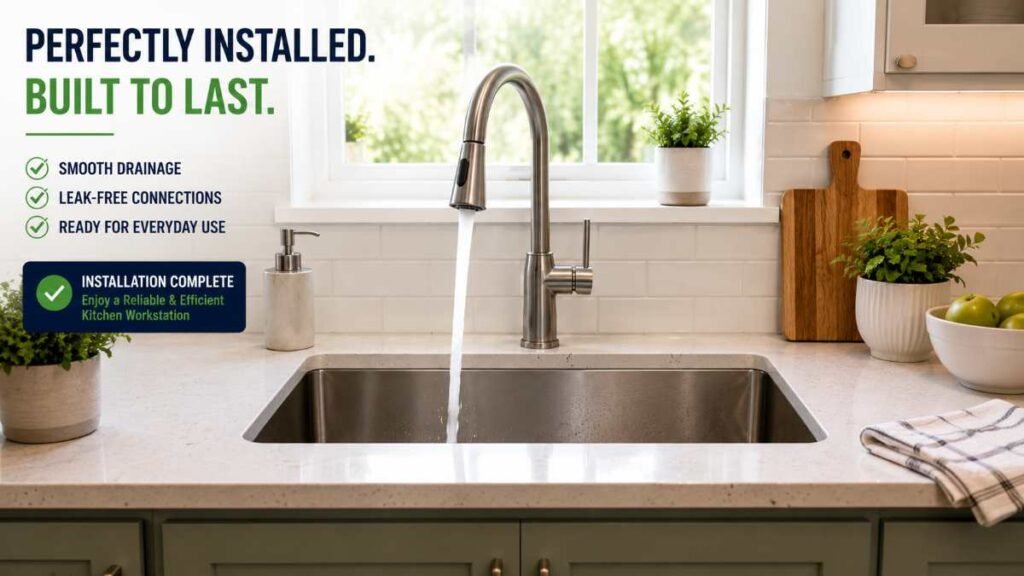
If I were upgrading my own kitchen today, I’d choose a 16-gauge stainless steel single-bowl sink paired with a high-arch pull-down faucet. It offers the ultimate balance of durability, easy maintenance, daily convenience, and long-term value.
People also ask
Q1: What is the average price to install a kitchen sink? Ans: On average, professional kitchen sink installation costs between $200 and $600 for labor, depending on countertop modifications and pipe alignment.
Q2: Can I install my own kitchen sink? Ans: Yes! You can complete a drop-in kitchen sink installation yourself in 3–4 hours with basic tools. However, heavy undermount stone setups are best handled by a pro.
Q3: How long does a sink setup take? Ans: A standard replacement takes about 3 to 4 hours, plus 24 hours for the silicone sealant to fully cure.
External References
Author By: Dambar C. Rajbanshi About: A renovation strategist and home improvement enthusiast. Dambar specializes in budget-smart planning and functional kitchen design. He is dedicated to helping homeowners create spaces that perfectly balance beauty and practicality